Sunday, September 22, 2019
Thursday, September 19, 2019
Genius HOUR
1. Students will select a topic they are passionate about.
2. They will develop an inquiry question about
this topic, research it, and plan a project with a culminating presentation to
share with classmates and families.
3. Students will be assuming adult roles such as author, video game
creator, piano teacher, instructional film producer, cupcake bakery entrepreneur,
rocket designer, architect, sports trainer, website designer, environmental
activist, and historian.
4. Products will
include: short instructional videos, websites, public service campaigns, how-to
books, fantasy novels, rocket and how-to presentation, and models.
You will have 7 weeks of 1 hour work sessions in
class. Students will also need to work at least
1 hour per week outside of class time.
The total number of hours will range from 10-20+, depending upon student
work outside of class.
Sunday, September 15, 2019
Wednesday, September 11, 2019
POPCORN critique
Open your sketchbooks up to your Elements of Art project, place it at the "dinner table"
Sit/stand around the table - we're going to take turns talking about the way you interpreted the elements of art. When your sketchbook is critiqued, you will go next.
Sit/stand around the table - we're going to take turns talking about the way you interpreted the elements of art. When your sketchbook is critiqued, you will go next.
Sunday, September 8, 2019
Elements of Art Assignment
Create a two page journal entry for the ELEMENTS of ART. (If you need more space, move onto another page)
What to do? In addition to a definition for each element, make sure you indicate the following:
Line: Show the following different types of lines: Vertical, Horizontal, Diagonal, Zigzag, Curved, Width, Texture (You can use whatever materials you need, pencils, markers, thread/yarn)


What to do? In addition to a definition for each element, make sure you indicate the following:
Line: Show the following different types of lines: Vertical, Horizontal, Diagonal, Zigzag, Curved, Width, Texture (You can use whatever materials you need, pencils, markers, thread/yarn)
Shape: Create both geometric and organic (make these out of cut paper - construction paper, magazines, newspaper, foil, wrapping paper - be creative).
Form: find pictures of forms - find a ball, cone, cube.
Space: Create positive/negative space. Use cutout paper. You will need scraps for this one. Label background, foreground, middleground.
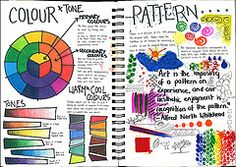
Color: Make a simple 6-color wheel (primary and secondary colors) You can use colored pencils, markers, magazine cutouts...
Value: Make two value scales using a regular pencil and a colored pencil. Go from light to dark.
Texture: Make at least 4 rubbings of different textures. Glue them into your sketchbook.
SKETCHBOOKS OUT - Answer the following and get a stamp!
Bell Ringer:
What skills did we need to be successful at the beach ball activity?
How can we use those skills to be successful in class this year?
What are we going to learn today?
The importance of the Elements of Art
Why?
These elements are the building blocks, or ingredients, of art.
In your sketchbooks, you are going to take some notes on the following slideshow:
Wednesday, September 4, 2019
Sunday, April 28, 2019


Wednesday, February 6, 2019
Self-Reflective Initials
Symbolic self reflective Initial

Essential Questions:
2. How can you express yourself visually and symbolically?
3. What do you want people to notice about you?
Steps:
2. Brainstorm and sketch out different things that symbolize who you are. You can use words and drawings.
3. Go through magazines and find images that represent who you are, cut out and save.
4. Practice different fonts and draw your initial in your sketchbook.
5. Design the shape of a letter on drawing paper using a pencil. The letter should be a minimum of 2- 1/2” thick in all areas, but may be up to 14” x 22” in overall size. Cut the letter out and use it as a pattern to trace onto both chipboard pieces, then cut out.
6. Take one chipboard letter, right- side-up and glue paper cups onto it, staggering them up and down so the cups fit together, see (A). The more cups used, the stronger the letter will be. Allow glue to dry until tacky (or longer), then glue the top letter in place, being careful to align it with the bottom letter. Allow to dry completely.
7. Dampen a sponge and place it onto a plate. Cut paper tape into a variety of lengths. Dampen the adhesive on the tape and press an end on the top side. Smooth gently around and adhere it to the back side. Continue until all surfaces are completely covered with at least two layers of paper tape. Apply the tape as smoothly as possible, avoiding excessive overlapping.
8. As an option, apply two coats of acrylic gesso to make the surface white and help seal any edges. Allow the gesso to dry between coats.
9. Embellish the surface of the letter with descriptive words, images and symbols that are meaningful to the your personal identity.
10. Create an artist statement explaining your piece, what it represents, and what you want the viewer to understand by viewing your piece.
11. Prepare to read your artist statement and explain your work to the class.
2. Collage: Collect photos, magazine cut- outs, colorful paper, tissue and more. Apply them decoupage-style to the surface of the letter. Gesso is not needed as a primer for this technique.
3. Painting: Priming the surface with gesso first will make colors brighter and easier to apply. Use acrylic or premium-grade tempera colors to create designs.
In this lesson plan, you will design and construct a 3- dimensional letter using one of your initials. The surface will be decorated with descriptive words and images creating a collage that is personally meaningful and unique to the your identity. You can use photos, magazine clippings, drawings and paintings.
2. How can you express yourself visually and symbolically?
3. What do you want people to notice about you?
Steps:
2. Brainstorm and sketch out different things that symbolize who you are. You can use words and drawings.
3. Go through magazines and find images that represent who you are, cut out and save.
4. Practice different fonts and draw your initial in your sketchbook.
5. Design the shape of a letter on drawing paper using a pencil. The letter should be a minimum of 2- 1/2” thick in all areas, but may be up to 14” x 22” in overall size. Cut the letter out and use it as a pattern to trace onto both chipboard pieces, then cut out.
6. Take one chipboard letter, right- side-up and glue paper cups onto it, staggering them up and down so the cups fit together, see (A). The more cups used, the stronger the letter will be. Allow glue to dry until tacky (or longer), then glue the top letter in place, being careful to align it with the bottom letter. Allow to dry completely.
7. Dampen a sponge and place it onto a plate. Cut paper tape into a variety of lengths. Dampen the adhesive on the tape and press an end on the top side. Smooth gently around and adhere it to the back side. Continue until all surfaces are completely covered with at least two layers of paper tape. Apply the tape as smoothly as possible, avoiding excessive overlapping.
8. As an option, apply two coats of acrylic gesso to make the surface white and help seal any edges. Allow the gesso to dry between coats.
9. Embellish the surface of the letter with descriptive words, images and symbols that are meaningful to the your personal identity.
10. Create an artist statement explaining your piece, what it represents, and what you want the viewer to understand by viewing your piece.
11. Prepare to read your artist statement and explain your work to the class.
Some options for surface decoration include:
1. Drawing: Coating the packing tape with acrylic gesso will create a smooth, white surface for drawing with colored pencils or markers; see example on page.
2. Collage: Collect photos, magazine cut- outs, colorful paper, tissue and more. Apply them decoupage-style to the surface of the letter. Gesso is not needed as a primer for this technique.
3. Painting: Priming the surface with gesso first will make colors brighter and easier to apply. Use acrylic or premium-grade tempera colors to create designs.
Subscribe to:
Posts (Atom)